Various functions can be performed on formulas to display or hide them, make them easily displayed in cells (in addition to the formula bar), You can also use names, built-in-functions and nested functions for more flexibility when defining formulas. Wizards are also available to make it easier to create and edit formulas.
Display or hide formulas
You can control the display of formulas in the following ways:
- Switch between displaying formulas and their results from the ribbon
- Show Formulas in desktop
- Switch between displaying formulas and their results from the keyboard
- Prevent a formula from displaying in the formula bar
- Show formulas that were previously hidden by removing protection
Show and print formulas
Formula results are shown in Tabulation cells, while formulas are visible in the formula bar only so that they won't appear when you print. Showing formulas in the cells makes it easy to find cells that contain formulas, or to check for errors.
With a quick key combination you can see formulas instead of formula results in a worksheet.
Formulas visible in a Tabulation worksheet
To show formulas in all cells press CTRL+` (that little mark is the grave accent mark key). When the formulas are visible, print your worksheet as you normally would.
To switch back to showing formula results in all cells, press CTRL+` again.
Tip: If you're having trouble finding the grave accent mark key (`), it is often located in the upper left corner on keyboards, but not always. If it's difficult to find on your keyboard, you can also show and hide formulas by going to the Formulas tab and then clicking Show Formulas. To switch back to the standard view, click the button again.
Names in formulas
A name is a meaningful shorthand that makes it easier to understand the purpose of a cell reference, constant, formula, or table, each of which may be difficult to understand at first glance.
Using functions and nested functions in formulas
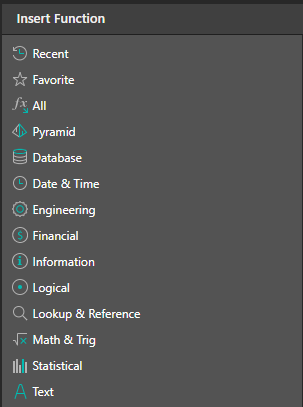
Functions are predefined formulas that perform calculations by using specific values, called arguments, in a particular order, or structure. Functions can be used to perform simple or complex calculations. You can find all of Tabulate's functions by clicking Function on the ribbon above the Tabulate worksheet:
Function syntax
The following example of the ROUND function rounding off a number in cell A10 illustrates a function's syntax.
=ROUND(A10,2)
- Structure. The structure of a function begins with an equal sign (=), followed by the function name, an opening parenthesis, the arguments for the function separated by commas, and a closing parenthesis.
- Function name. For a list of available functions, click a cell and click the function button (shown above), which will launch the Insert Function dialog.
- Arguments. Arguments can be numbers, text, logical values such as TRUE or FALSE, arrays, error values such as #N/A, or cell references. The argument you designate must produce a valid value for that argument. Arguments can also be constants, formulas, or other functions.
- Argument tooltip. A tooltip with the syntax and arguments appears as you type the function. For example, type =ROUND( and the tooltip appears. Tooltips appear only for built-in functions.
Note: You don't need to type functions in all caps, like =ROUND, as Tabulate will automatically capitalize the function name for you once you press enter. If you misspell a function name, like =SUME(A1:A10) instead of =SUM(A1:A10), then Tabulate will return a #NAME? error.
Entering functions
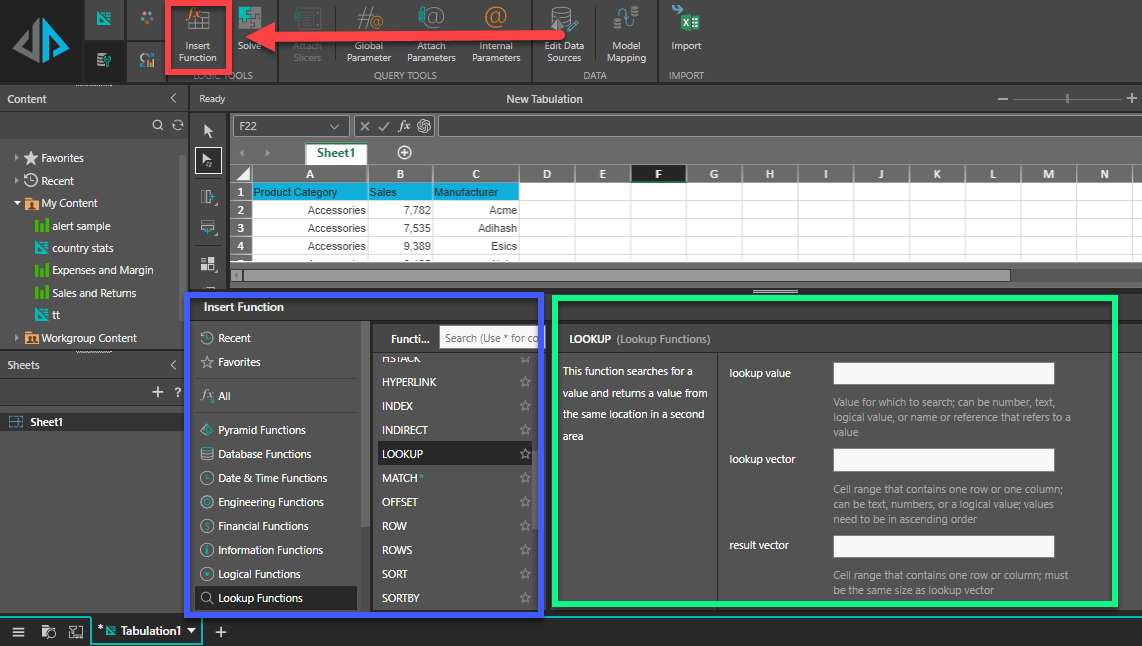
When you create a formula that contains a function, you can use the Insert Function dialog box (red highlight) to help you enter worksheet functions. Once you select a function from the Insert Function dialog (blue highlight), Tabulate will launch a function wizard (green highlight), which displays the name of the function, each of its arguments, a description of the function and each argument, the current result of the function, and the current result of the entire formula.
Formula Wizard
To make it easier to create and edit formulas and minimize typing and syntax errors, use Formula AutoComplete. After you type an = (equal sign) and beginning letters of a function, Tabulate displays a dynamic dropdown list of valid functions, arguments, and names that match those letters. You can then select one from the dropdown list and Tabulate will enter it for you.
Nesting functions
In certain cases, you may need to use a function as one of the arguments of another function. For example, the following formula uses a nested AVERAGE function and compares the result with the value 50.
=IF(AVERAGE(C1:C20)>50,"Average is more than 50","Average is less than 50")
T
Valid returns: When a nested function is used as an argument, the nested function must return the same type of value that the argument requires. For example, if the argument requires a TRUE or FALSE value, the nested function must return a TRUE or FALSE value. If the function doesn't, Tabulate displays a #VALUE! error value.
Nesting level limits: A formula can contain up to seven levels of nested functions. When one function (we'll call this Function B) is used as an argument in another function (we'll call this Function A), Function B acts as a second-level function. For example, the AVERAGE function and the SUM function are both second-level functions if they are used as arguments of the IF function. A function nested within the nested AVERAGE function is then a third-level function, and so on.
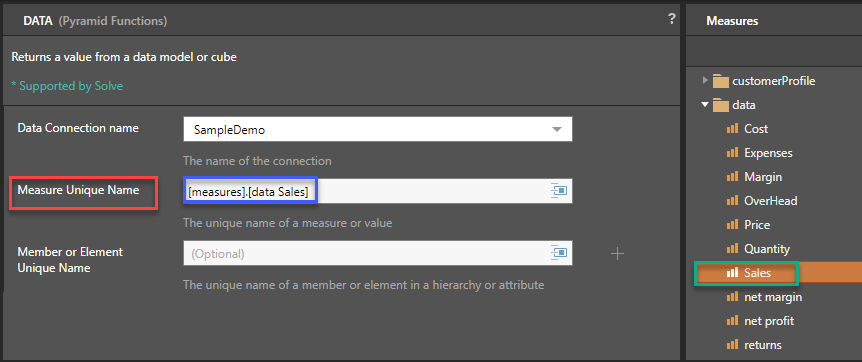
In this example we will access the Sales for USA from the SampleDemo
Step 1
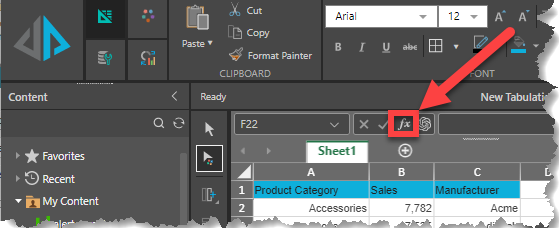
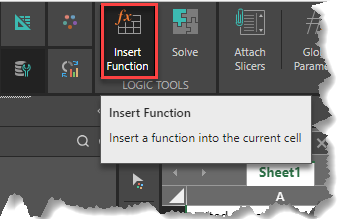
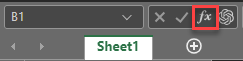
Click on the Insert Function button from advanced settings
Or on the fx button from the status bar
Step 2
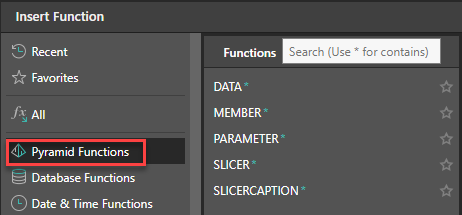
Select Pyramid Functions to retrieve the data query functions (data, member, parameter, slicer, slicercaption)
Step 3
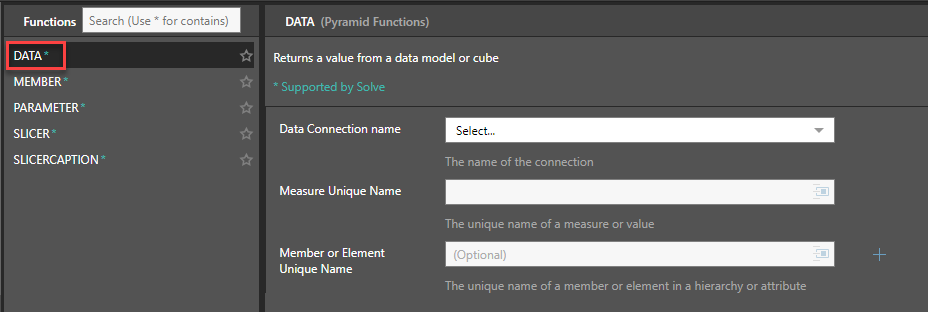
Select the Data Function
Step 4
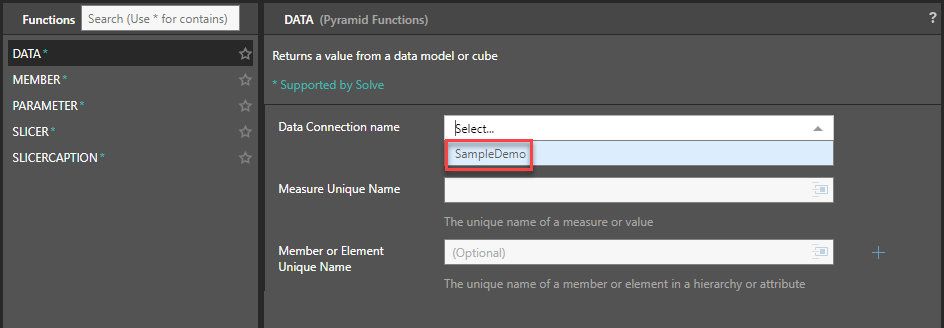
Select SampleDemo from the data connection name dropdown list
Step 5
Select Sales (green box) from the dropdown list of Measure Unique Name (red box) for the selected Data Connection. The selected measure name will be displayed (blue box)
Step 6
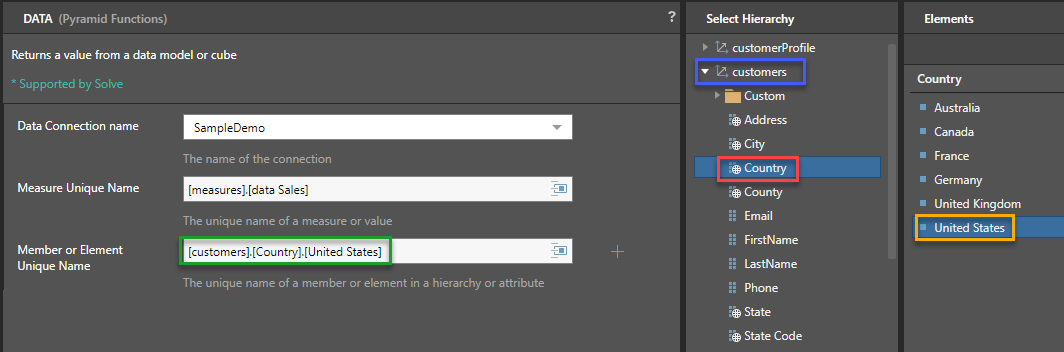
Select Country(red box) from the customers Hierarchy (blue box), then select United States (orange box) as the unique member name. The selected member will be displayed (green box)
Step 7
Click Apply and the amount (red box) will be displayed in the Tabulate worksheet, with the formula (blue box) displayed in the formula bar.

More Formulas Details topics